
Your Guide to Soil Testing on a Dairy Farm
Practical pasture decisions for farms that need clear, reliable information.
Your Guide to Soil Testing on a Dairy Farm
Soil sampling and soil testing – is the key to healthy soil, healthy pasture and healthy cattle.
If you don’t know the nutrients in your dairy farm’s pasture soil – you might be at risk.
Of what? Of growing less grass than is possible, producing a less nutritious feed, and even at risk of damaging the health of your soil, cows and harming the environment as well.
It’s that important that you do a soil analysis on your dairy farm!
Let’s get more in-depth with it.
Why it’s important to do soil testing on a dairy farm:
1. Get exceptional growth rates with your pasture
2. Grow nutritious grass that genuinely feeds your cows
3. Avoid damaging the health of your soil
4. Avoid harming the health of your cows
5. How do I take a soil sample?
1. Get exceptional growth rates with your pasture
The health and abundance of your pastures depend on healthy and nutritious soil. Without one, your pasture will suffer in more than one way.
Firstly, without a nutritious soil – your pasture’s growth rate will be slow.
This slow growth rate can cause a series of problems – from unwanted changes in your pasture management plan to stress and frustration.
It will also cause less dry matter to grow for your cattle and might bring about the need for additional bought-in feed.
This bought-in feed will (obviously) mean – more expenses for your dairy farm. These costs you can avoid if you take action and do a proper nutrient management plan – starting with a soil sample and soil test.
A well-balanced pH level in your soil can potentially lead to a 50% increase in your pasture yield. A quite significant percentage is dependent on a very easy to retrieve piece of information. In this case, why not get a local lab to act like your quick, efficient and cheap soil pH tester?
2. Grow nutritious grass that genuinely feeds your cows
Dairy farms that don't have an excellent pasture management plan or a nutrient management plan end up spending a lot of money on additional fodder for their cows.
If you believe you are sparing time from creating pasture and nutrient management plans – and earning more money like this, you will end up spending more money, if not today, in the long- run.
A good nutrient management plan relies on soil sampling and soil testing. For dairy farms – it’s recommended that you test your soil – at least every three years.
Once you know the nutrient makeup of your soil – you also get an idea of the nutrients that your cattle are getting via their feed intake.
Less nutritious grass equals fewer nutrients in your cattle equals less milk production and poorer animal health.
Then to fix this problem – you might end up spending money on additional feed, for which you don't know for sure the number of nutrients in it or the soil it has grown in without spending money on feed testing (which is the recommendation).
Then – why not take matters in your own hands? Sample and test your soil and make sure it has all the nutrients it needs to grow rich and nutritious grass. Grass that leaves your cattle healthy and producing the most milk they can.
Remove many of your worries and problems by going straight to the root of the matter – your soil. Soil test for grass to get good grass growth and animal performance.
3. Avoid damaging the health of your soil
If you haven't tested your soil but are applying fertilisers – you might be damaging your land.
Not improving soil health and nutrient richness.
If your soil has a balanced level of acidity or a high level of acidity (pH) and you fail to add a buffer such as additional lime – the pH of your soil will not reach healthy levels.
Why is this bad?
A high level of acidity in your soil will create damage to the ‘crumbliness’ property of your soil.
What does this mean?
You will have to deal with the “soil friability effect” – which causes a very compact and hard soil.
Even if this might sound like a good thing – it’s not. It’s not like with bread baking – where you want your bread to be nice and not to crumble. On the opposite, you want your soil to crumble – it’s a sign that it’s a healthy soil that is rich in nutrients.
A friable soil is also essential because it allows for adequate and healthy drainage to take place. Otherwise, you will have problems when your soil becomes water clogged.
The acidity destroys and eats through your soil crumbs – which are rich in minerals. This negative effect doesn’t happen overnight.
You might be applying lime and other nutrients and then wake up in a few months with your soil hardened and less pasture has grown, or you even have dead grass. All while you were expecting to see a higher pasture cover and a higher pasture growth rate.
Fertilising past the needed level doesn't only destroy the friability of your soil – but can also damage healthy micro-organisms in your soil.
Micro-organisms that help raise your pasture’s defences against degradation, damage and pests or diseases. Micro-organisms which are also in charge of balancing out the nitrogen level in your soil – which if killed, can either lower it or raise too much.
4. Avoid harming the health of your cows
It's probably no surprise that healthy cows need nutritious pastureland to graze.
It should then be no surprise that unhealthy pastureland will make your cows sick. And what makes pastureland unhealthy? Unhealthy soil.
Healthy soil depends on many practices including rotational grazing, fertilising and soil sampling and testing.
Sampling and testing your soil for pasture will let you know about essential nutrients such as nitrogen, phosphorous and potassium, but also about iron and zinc among other trace minerals.
It will also tell you about your soil's pH level. Once you know this, you can add fertilisers to balance the levels of each nutrient – making sure your cattle are getting healthy nutritious grass.
What are the health consequences of cows eating unfertile grass? One big issue is dairy cow fertility.
According to the study ‘Impact of nutrition on fertility in dairy cattle, with particular reference to grass-based diets' – cows take longer to return to oestrus, display more minor signs of oestrus, have more significant early embryo loss and may have more reduced conception rates.
The same study puts this problem on … nutrition.
Which means – it's not permanent, and is fixed with adjusted nutrition.
Instead of giving your cows artificial supplements, or additional expensive feed … it's better to decide on an organic, holistic solution and fix the nutrients in your soil.
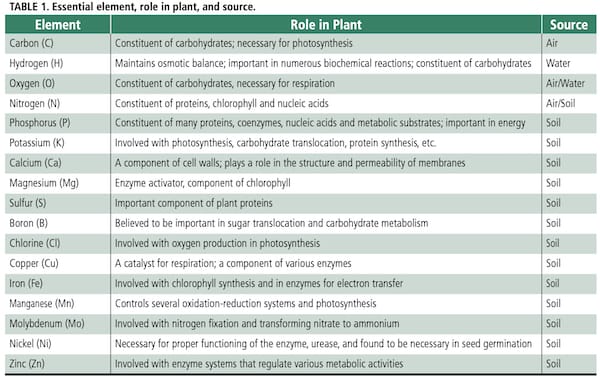
Which are the critical nutrients for soil and grass?
There are 17 essential soil nutrients for healthy plant growth – including pasture. Here is a list including all of them and their role in plants.
5. How do I take a soil sample?
Once you have your soil sample, you can send it to independent laboratories, local cooperative extension offices, or even garden centres in your area.
It’s usually very affordable to test your soil. It’s affordable not only in Australia but all over the world.
In the U.S. the price varies between $10 and $50. In the U.K., a soil test can cost around £20 while in Australia the price is slightly steeper – reaching 350 AUD, which is still an affordable price considering the long-term benefits of testing your soil.
To take a soil sample, follow these easy steps:
1. Using a shovel, soil probe, spade, soil auger, sampling tube, or any other ideal too, collect soil sample to a depth of 5 to 7 inches.
2. Make sure to remove all grass, thatch, stones of debris in the soil sample that you collected.
3. Repeat this step 6 to 7 times until you get 6 to 7 soil samples.
4. Mix these samples in a plastic bucket. Ensure that you have collected at least 1 pint of soil.
5. Spread the soil sample you collected over a dry paper, such as a newspaper, and let dry for 24 hours. Most laboratories prefer dry soils, although there is no sure way to remove all moisture.
6. Lastly, label the soil sample properly before sending it to the laboratory.
When should I take a soil sample?
Depending on soil temperature and moisture, soil test levels change in the course of one year.
This change is why soil samples should be collected at the same time each year to ensure that the results are comparable.
For example, during summer and fall, nutrient levels are generally lower compared to winter and spring.
More so, knowing when to collect soil samples depends on the status of the soil. For a dairy farm, the land needs to be tested every two to three years.
But if you suspect a nutrient deficiency, you may collect your soil sample and test your soil once per crop rotation or once every other year if the soil is fertilised and cropped intensively.
Meanwhile, annual sampling is highly recommended if you have high-value crops.
Extra soil testing tips:
Take note not to do a soil analysis 3 to 6 months after you have fertilised your soil with P and K.
Also, if you have applied lime on your soil – take a soil test only two years after the application.
I hope you’ve got plenty of information on soil sampling and soil testing on a dairy farm.
If you have any questions – feel free to comment below! Happy farming!
I do reply to every comment and would love to hear your experiences with weed control and which method you deploy in the comments below.
Happy farming!
- The Dedicated Team of Pasture.io, 2019-10-09